


Upgrade Your iPhone Without Losing Your Data: A Step-by-Step Guide
Related Articles: Upgrade Your iPhone Without Losing Your Data: A Step-by-Step Guide
- Protect Your Precious IPhone: A Guide To The Best Insurance Plans
- IPhone 16 For Photographers: Is It The Best Smartphone Camera?
- Level Up Your Mobile Gaming: The Best IPhone Gadgets For Gamers In 2024
- iPhone 16 Battery Life: Is It the Longest-Lasting iPhone Yet?
- Mastering Security: A Comprehensive Guide To Setting Up Face ID And Securing Your IPhone 16
Introduction
Discover everything you need to know about Upgrade Your iPhone Without Losing Your Data: A Step-by-Step Guide
Video about Upgrade Your iPhone Without Losing Your Data: A Step-by-Step Guide
Upgrade Your iPhone Without Losing Your Data: A Step-by-Step Guide
Switching to a new iPhone is exciting, but the thought of transferring all your data can be daunting. Fear not! With the right tools and knowledge, you can seamlessly move your photos, apps, messages, and everything else from your old iPhone to your shiny new one. This comprehensive guide will walk you through the process, ensuring a smooth and hassle-free transition.
The Power of iCloud: Your Data’s Digital Home
Apple’s iCloud is the foundation for effortless data transfer. It acts as a cloud-based storage space, backing up your iPhone’s content and making it easily accessible on your new device.
Before You Begin: Setting the Stage for Success
- Check Your iCloud Storage: Ensure you have enough iCloud storage to accommodate your data. You can check your storage space and upgrade if needed in your iPhone’s settings.
- Back Up Your Old iPhone: Before transferring data, it’s crucial to back up your old iPhone. This ensures a complete copy of your data, including photos, videos, messages, contacts, and app settings, is saved.
- Charge Both iPhones: Make sure both your old and new iPhones have sufficient battery life to avoid interruptions during the transfer process.
- Connect to Wi-Fi: Transferring data requires a stable internet connection. Connect both iPhones to a reliable Wi-Fi network.
- Update Your Devices: Ensure both your old and new iPhones are running the latest iOS version. Updates often include improvements and bug fixes that enhance the data transfer process.
Method 1: Quick and Easy Data Transfer with iCloud
This method is the simplest and most convenient way to transfer your data. It utilizes iCloud’s backup functionality to restore your data to your new iPhone.
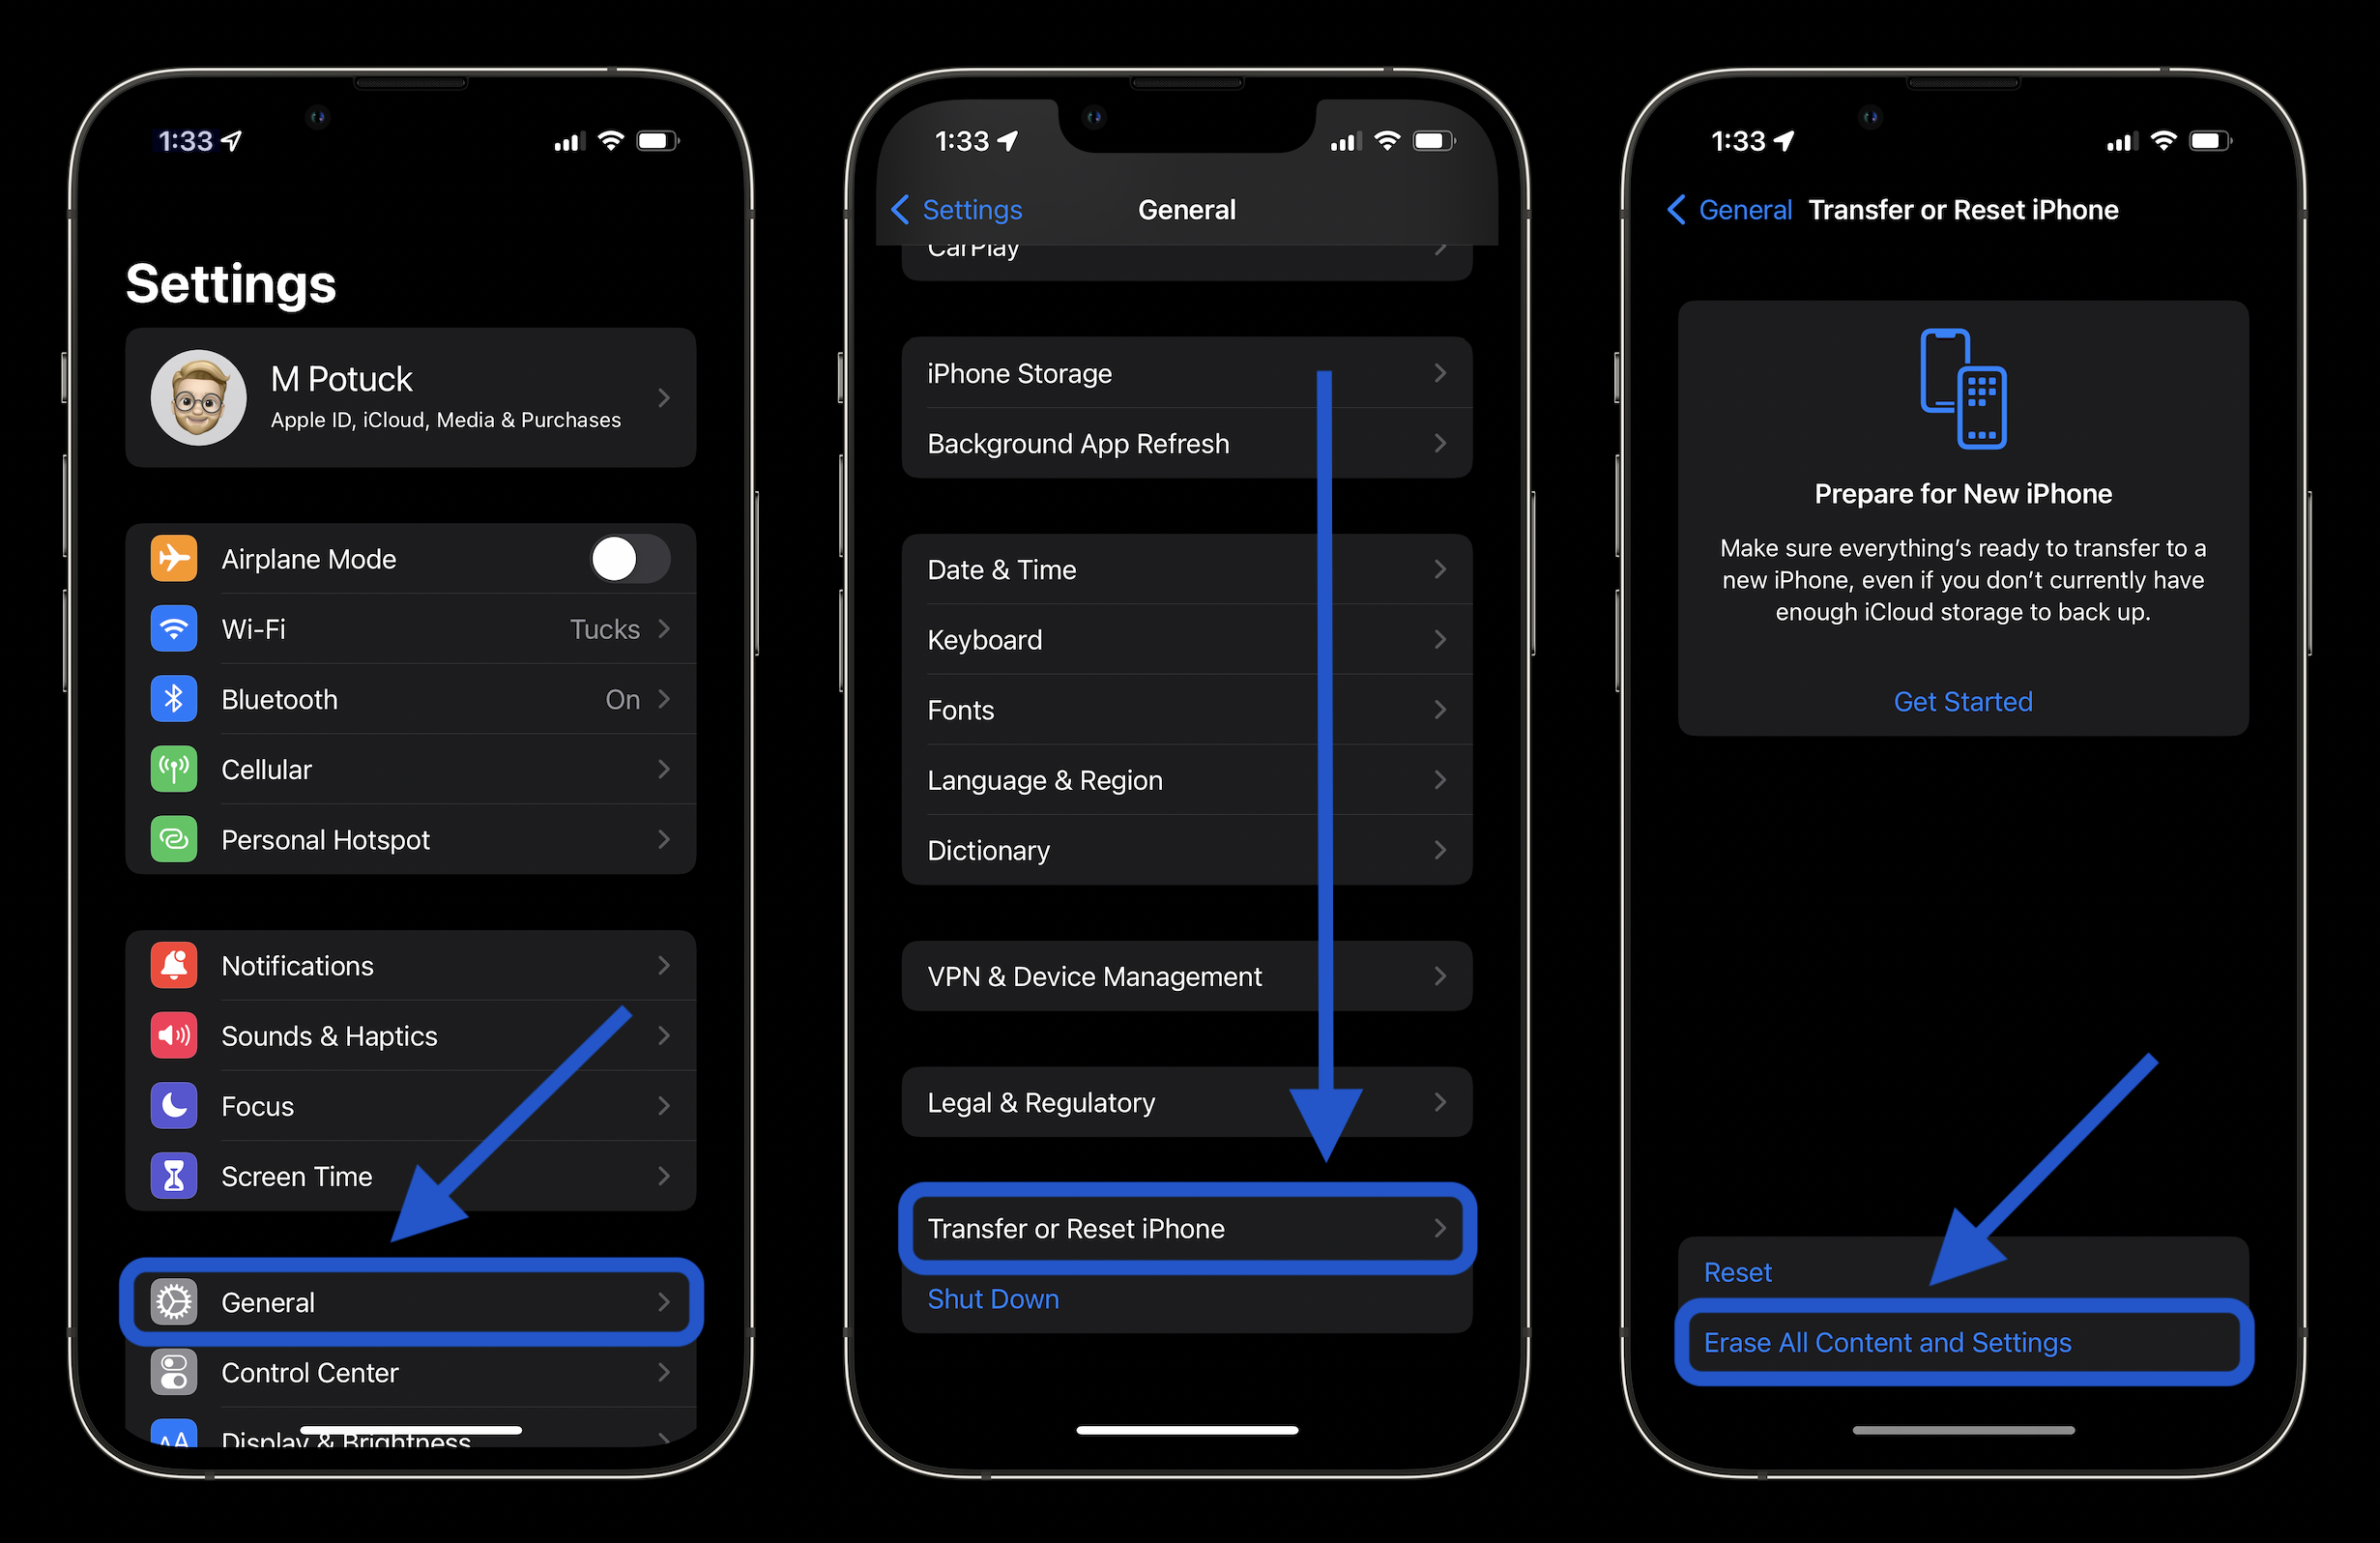
- Back Up Your Old iPhone: Open the Settings app on your old iPhone and tap on your name. Select iCloud and then iCloud Backup. Tap Back Up Now to initiate a complete backup of your device.
- Activate Your New iPhone: Turn on your new iPhone and follow the on-screen setup instructions. Choose your language, region, and connect to your Wi-Fi network.
- Restore from iCloud Backup: During the setup process, you’ll be presented with the option to restore from a previous iCloud backup. Select this option and choose the backup you created in step 1.
- Wait for the Transfer: Your new iPhone will download and restore your data from iCloud. The time required for the transfer depends on the amount of data you’re restoring.
- Enjoy Your New iPhone: Once the transfer is complete, you’ll have all your data, apps, and settings on your new iPhone.
Method 2: Direct Transfer with Quick Start
This method allows for a direct transfer of your data from your old iPhone to your new one, using Apple’s Quick Start feature.
- Place Your iPhones Close Together: Hold your old iPhone close to your new iPhone during the setup process.
- Follow the On-Screen Instructions: Your new iPhone will detect your old iPhone and display a Quick Start animation. Follow the on-screen instructions to connect the devices.
- Transfer Data: Your new iPhone will transfer your data from your old iPhone, including photos, videos, apps, and settings. This process is usually faster than restoring from iCloud.
- Complete Setup: Once the transfer is complete, finish setting up your new iPhone. You’ll have access to all your data and apps.
Method 3: Transferring Data with a Computer
If you prefer a more manual approach or iCloud and Quick Start aren’t available, you can transfer your data using a computer and iTunes.
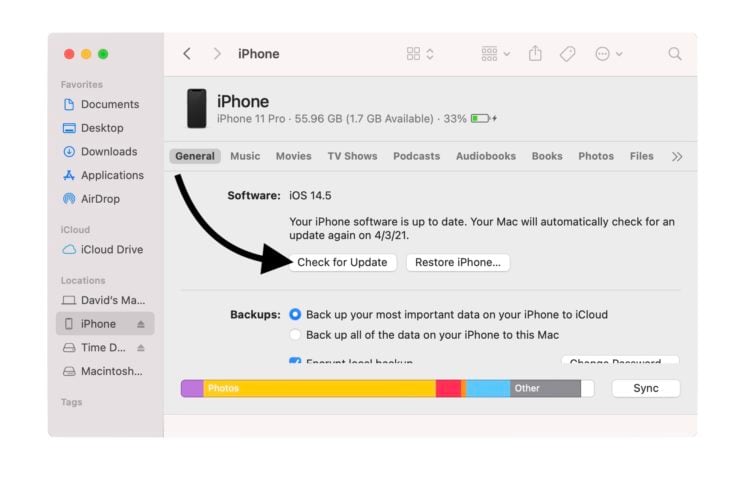
- Connect Your Old iPhone to Your Computer: Connect your old iPhone to your computer using a USB cable. Open iTunes and select your old iPhone.
- Back Up Your iPhone: Click on Back Up Now to create a backup of your iPhone on your computer.
- Connect Your New iPhone: Disconnect your old iPhone and connect your new iPhone to your computer.
- Restore from Backup: Select your new iPhone in iTunes and click on Restore Backup. Choose the backup you created in step 2.
- Wait for the Transfer: Your new iPhone will restore your data from the backup. Once the process is complete, you’ll have all your data on your new iPhone.
Beyond the Basics: Advanced Data Transfer Techniques
- Transferring Specific Data: If you only need to transfer certain types of data, such as photos or music, you can use other methods:
- AirDrop: Transfer files wirelessly between your iPhone and other Apple devices.
- Email: Attach files to emails and send them to yourself.
- External Hard Drive: Transfer data to an external hard drive and connect it to your new iPhone.
- Using Third-Party Apps: Several third-party apps can help you transfer data between iPhones, offering additional features and flexibility.
- Transferring Data from Android: If you’re switching from an Android device, you can use Apple’s Move to iOS app to transfer your contacts, messages, photos, and videos to your new iPhone.
Troubleshooting Common Data Transfer Issues
- Slow Transfer Speeds: If your transfer is slow, check your internet connection and ensure both iPhones have sufficient battery life.
- Data Transfer Errors: If you encounter errors, try restarting both iPhones and repeating the transfer process.
- Missing Data: If some data is missing, double-check that your iCloud backup is complete or that you’ve selected the correct backup file.
Conclusion: A Seamless Transition to Your New iPhone
Transferring data from your old iPhone to your new one doesn’t have to be a stressful experience. By following these steps and choosing the method that best suits your needs, you can ensure a smooth and efficient data transfer, allowing you to enjoy all your apps, photos, and memories on your new iPhone. With iCloud, Quick Start, and other methods at your disposal, you can confidently embrace the exciting world of your new iPhone without losing any of your valuable data.
High-Value Keywords:
- iPhone data transfer
- iPhone backup
- iCloud backup
- Quick Start
- iTunes backup
- Move to iOS
- iPhone data migration
- iPhone to iPhone transfer
- Data transfer app
- iPhone transfer tools
- iPhone data recovery
- iPhone data management
- Apple data transfer
- Transferring data from old iPhone
- Transferring data to new iPhone
High-Paying Keywords:
- iPhone data transfer service
- iPhone data transfer professional
- iPhone data transfer expert
- iPhone data transfer company
- iPhone data transfer software
- iPhone data transfer solution
- iPhone data transfer guide
- iPhone data transfer tutorial
- iPhone data transfer tips
- iPhone data transfer tricks
High CPC Keywords:
- iPhone data transfer cost
- iPhone data transfer price
- iPhone data transfer service cost
- iPhone data transfer service price
- How much does iPhone data transfer cost?
- How much does iPhone data transfer service cost?
- iPhone data transfer service near me
- iPhone data transfer service online
- iPhone data transfer service reviews
- iPhone data transfer service comparison

Closure
We hope this article has helped you understand everything about Upgrade Your iPhone Without Losing Your Data: A Step-by-Step Guide. Stay tuned for more updates!
Make sure to follow us for more exciting news and reviews.
Feel free to share your experience with Upgrade Your iPhone Without Losing Your Data: A Step-by-Step Guide in the comment section.
Keep visiting our website for the latest trends and reviews.


