


Unlocking the Future: Setting Up Face ID on Your iPhone 16 in 5 Easy Steps
Related Articles
- Unlocking The IPhone’s Pro Potential: Camera Settings For Stunning Photos
- Unlock Your IPhone’s Potential: Common Fixes You Can Do Yourself
- IPhone 15 Vs IPhone 14: Is It Worth The Upgrade?
- IPhone Vs. Android: Why IPhone Still Leads In 2024
- Unveiling The Hidden Gems: IPhone 15 Features You Didn’t Know Existed
Introduction
Join us as we explore Unlocking the Future: Setting Up Face ID on Your iPhone 16 in 5 Easy Steps, packed with exciting updates
Video about
Unlocking the Future: Setting Up Face ID on Your iPhone 16 in 5 Easy Steps
The iPhone 16 is here, and with it comes a whole new level of security and convenience: Face ID. This revolutionary technology lets you unlock your phone, authorize purchases, and even log into apps using just your face. But before you can experience the magic of Face ID, you need to set it up. Don’t worry, it’s a breeze!
This comprehensive guide will walk you through the process of setting up Face ID on your iPhone 16 in 5 simple steps, ensuring a smooth and secure experience.
Step 1: Getting Started: The Setup Process
Power On Your iPhone 16: The first step is to turn on your brand new iPhone 16. This will bring you to the initial setup screen.
Choose Your Language: Select your preferred language from the list presented. This will ensure you can navigate the setup process comfortably.
Connect to Wi-Fi: To download essential software updates and complete the setup process, you’ll need to connect to a Wi-Fi network.
Agree to Terms and Conditions: Read through the Apple terms and conditions and tap "Agree" to proceed.
Set Up Your Apple ID: If you don’t already have an Apple ID, you can create one during the setup process. This will allow you to access various Apple services and features.
Choose Your Location: Select your current location to personalize your iPhone’s experience, including weather updates and relevant apps.
Enable Location Services: Allow your iPhone to access your location to enhance the functionality of various apps and services.
Set Up Siri: Choose whether you want to enable Siri, Apple’s voice assistant, and set up your preferred language.
Enable Find My iPhone: This feature helps you locate your iPhone if it’s ever lost or stolen. Enable it for added peace of mind.
Set Up Touch ID: While Face ID is the primary security feature, Touch ID remains a convenient option for unlocking your phone. If you wish to use it, you can enroll your fingerprint during this step.
Set Up Your Passcode: This is a critical step! Your passcode acts as a backup security measure if Face ID fails to recognize you. Choose a strong and memorable passcode.
Transfer Data from Your Previous iPhone: If you’re upgrading from an older iPhone, you can transfer your data seamlessly using iCloud or a cable.

Step 2: The Face ID Setup: Enrolling Your Face
Now, it’s time to introduce your iPhone 16 to your face! This process is quick and easy, and it’s what makes Face ID so secure.
Tap "Set Up Face ID": You’ll find this option on your iPhone’s display.
Read the Instructions: Apple provides clear instructions on how to position your face during the enrollment process. Pay attention to these instructions for optimal results.
Position Your Face: Hold your iPhone at a comfortable distance, ensuring your face is fully visible within the frame.
Slowly Rotate Your Head: Follow the on-screen prompts to rotate your head slowly, allowing the iPhone to capture different angles of your face.
Confirm Your Face: Once the initial scan is complete, you’ll be asked to confirm your face by repeating the process. This helps ensure accuracy and security.
Set Up Alternate Appearance: You can optionally enroll a second appearance, such as if you wear glasses or have a significant change in your appearance. This allows Face ID to recognize you even with these variations.
Step 3: Understanding Face ID: How It Works
Face ID uses a sophisticated system of 3D sensors and advanced algorithms to accurately recognize your face. Here’s a breakdown of how it works:
TrueDepth Camera: Your iPhone 16’s TrueDepth camera is packed with cutting-edge technology, including a dot projector, an infrared camera, and a flood illuminator.
Dot Projector: This projects thousands of invisible dots onto your face, creating a unique 3D map of your facial features.
Infrared Camera: This camera captures a high-resolution infrared image of your face, even in low-light conditions.
Flood Illuminator: This provides additional illumination for the infrared camera, ensuring accurate face recognition even in dark environments.
Secure Enclave: The gathered data is processed within the iPhone’s Secure Enclave, a highly secure area of the device dedicated to protecting your personal information.
Facial Matching: The Secure Enclave compares the captured 3D data with your enrolled facial information.
Unlocking and Authentication: If the match is successful, your iPhone unlocks, and you can access your apps and data. If not, you’ll be prompted to enter your passcode.
Step 4: Troubleshooting and Tips
While Face ID is incredibly reliable, there are situations where it might not recognize you. Here are some troubleshooting tips:
Clean Your Camera: Make sure the TrueDepth camera is clean and free of smudges or fingerprints.
Check Lighting: Face ID works best in well-lit environments. Avoid using it in direct sunlight or extremely dim lighting.
Adjust Your Position: Ensure your face is positioned directly in front of the camera, at a comfortable distance.
Try Alternate Appearance: If you have a different appearance, such as wearing glasses or a hat, try using your alternate appearance if you’ve enrolled one.
Remove Accessories: Some accessories, like sunglasses or masks, can interfere with Face ID. Remove them before attempting to unlock your phone.
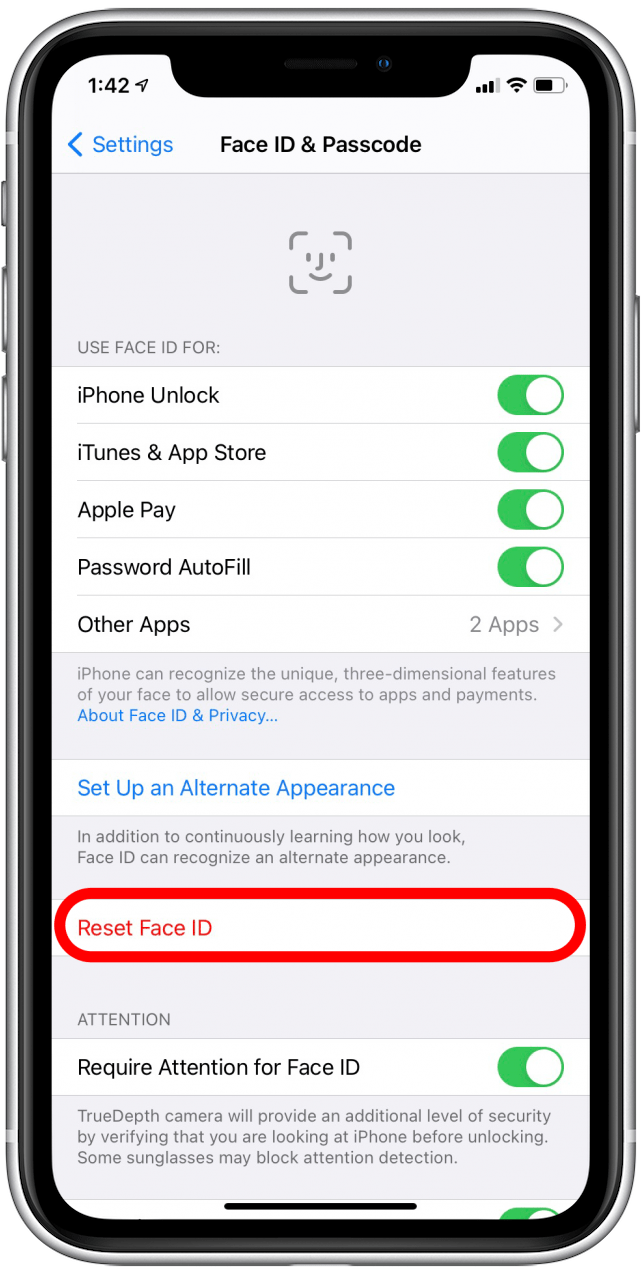
Disable Face ID: If you’re still experiencing problems, you can temporarily disable Face ID and use your passcode to unlock your iPhone.
Reset Face ID: If none of the above solutions work, you can reset Face ID and enroll your face again.
Step 5: Beyond Security: The Benefits of Face ID
Face ID is more than just a security feature; it’s a gateway to a more convenient and personalized iPhone experience. Here are some of the ways Face ID enhances your daily interactions with your device:
Secure Payments: Face ID makes online purchases safer and more convenient. You can authorize payments using Apple Pay with just a glance, eliminating the need for passwords or credit card numbers.
App Authentication: Many apps support Face ID, allowing you to log in securely and quickly without entering your username and password.
Privacy and Security: Face ID is highly secure, making it difficult for unauthorized individuals to access your device. It’s a significant improvement over fingerprint recognition, as it’s more challenging to spoof or replicate.
Accessibility: Face ID is accessible to people with disabilities who may not be able to use Touch ID.
Personalization: Face ID can be used to personalize your iPhone’s experience. For example, you can use it to unlock specific apps or to activate specific features.
Conclusion: Embracing the Future of Security and Convenience
Setting up Face ID on your iPhone 16 is a straightforward process that unlocks a world of security and convenience. By following these simple steps, you can ensure your phone is protected and enjoy the benefits of this cutting-edge technology.
Remember, Face ID is a powerful tool that safeguards your personal information and enhances your daily interactions with your iPhone. Embrace the future of security and convenience by setting up Face ID today!
Closure
We hope this article has helped you understand everything about Unlocking the Future: Setting Up Face ID on Your iPhone 16 in 5 Easy Steps. Stay tuned for more updates!
Make sure to follow us for more exciting news and reviews.
Feel free to share your experience with Unlocking the Future: Setting Up Face ID on Your iPhone 16 in 5 Easy Steps in the comment section.
Keep visiting our website for the latest trends and reviews.


