


Unleashing the iPhone 16 Pro Max’s RAW Power: A Deep Dive into Camera Settings
Related Articles
- Maximizing Your MacBook Pro M3 With The Perfect External Monitor Setup
- Protecting Your Pixel Paradise: A Deep Dive Into IPhone 16 Pro Max Camera Lens Protectors
- AirPods Pro 3: A Symphony Of Sound, Marred By A Noise Cancellation Concerto
- The Great IPhone 16 Pro Max Heatwave: A Guide To Staying Cool
- The IPhone 16 Pro Max: A Cinematic Masterclass In HDR Video Recording
Introduction
Join us as we explore Unleashing the iPhone 16 Pro Max’s RAW Power: A Deep Dive into Camera Settings, packed with exciting updates
Video about
Unleashing the iPhone 16 Pro Max’s RAW Power: A Deep Dive into Camera Settings

The iPhone 16 Pro Max is a powerhouse of photography, but its true potential lies in harnessing the raw power of its camera system. Capturing images in RAW format allows for unparalleled control over post-processing, unlocking a world of creative possibilities. This article will guide you through the intricacies of iPhone 16 Pro Max RAW settings, empowering you to capture breathtaking images and push the boundaries of mobile photography.
Understanding RAW: The Building Blocks of Photography
Unlike JPEGs, which compress image data, RAW files capture the unprocessed information directly from the sensor. This means every detail, every nuance of light and shadow, is preserved in its purest form. Imagine it like a digital negative, ready to be developed and manipulated to your heart’s content.
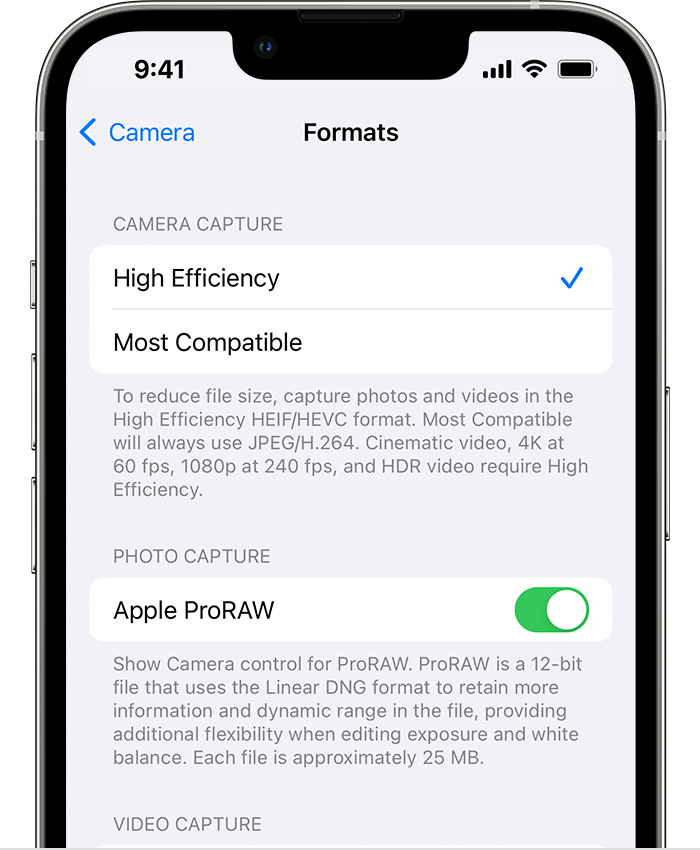
Accessing RAW Capture on the iPhone 16 Pro Max
The iPhone 16 Pro Max makes capturing RAW images incredibly easy. Simply open the Camera app and navigate to the settings (the cogwheel icon). Here, you’ll find the "Formats" option. Toggle the switch for "Apple ProRAW" to activate RAW capture.
RAW vs. JPEG: Choosing the Right Format
While RAW offers unparalleled flexibility, it’s not always the best choice. JPEGs are smaller, more convenient for sharing, and ideal for everyday snaps. However, if you’re aiming for professional-grade images, artistic freedom, or intend to make significant edits, RAW is the way to go.
Unveiling the RAW Settings: A Detailed Guide
The iPhone 16 Pro Max’s RAW settings offer a remarkable level of control. Let’s delve into each parameter, understanding its role in shaping your final image:
1. ISO:
- Definition: ISO determines the sensor’s sensitivity to light. Higher ISO values allow you to capture images in low-light conditions but introduce noise. Lower ISO values produce cleaner images but require more light.
- RAW Advantage: RAW files provide more flexibility in adjusting ISO during post-processing, allowing you to recover details in underexposed images or minimize noise in overexposed ones.
2. Shutter Speed:
- Definition: Shutter speed controls the duration for which the camera’s sensor is exposed to light. Faster shutter speeds freeze motion, while slower speeds create blur.
- RAW Advantage: RAW files allow you to fine-tune shutter speed during post-processing, ensuring you capture the perfect balance between motion and sharpness.
3. Aperture:
- Definition: Aperture controls the size of the lens opening, influencing the amount of light entering the camera. A wider aperture (lower f-stop) creates a shallow depth of field, blurring the background and isolating the subject. A narrower aperture (higher f-stop) increases depth of field, keeping everything in focus.
- RAW Advantage: RAW files allow you to adjust aperture virtually during post-processing, simulating different depth-of-field effects even if you shot with a fixed aperture lens.
4. White Balance:
- Definition: White balance adjusts the color temperature of an image, ensuring that whites appear neutral. Different light sources cast different colors, and white balance corrects these discrepancies.
- RAW Advantage: RAW files allow for precise white balance adjustments in post-processing, ensuring accurate colors even under challenging lighting conditions.
5. Exposure Compensation:
- Definition: Exposure compensation adjusts the overall brightness of the image. A positive value makes the image brighter, while a negative value darkens it.
- RAW Advantage: RAW files offer greater flexibility in adjusting exposure compensation, allowing you to fine-tune the image’s brightness without sacrificing detail.
6. Focus:
- Definition: Focus determines which part of the image is sharp. The iPhone 16 Pro Max’s autofocus system ensures accurate focus, but RAW files provide additional control.
- RAW Advantage: RAW files allow you to fine-tune focus during post-processing, ensuring the subject is perfectly sharp even if autofocus slightly missed the mark.
7. Lens Profiles:
- Definition: Lens profiles account for the unique distortions introduced by different lenses. They help correct these distortions, resulting in sharper and more accurate images.
- RAW Advantage: RAW files support lens profiles, allowing you to apply them during post-processing and achieve optimal image quality.
Beyond the Basics: Exploring Advanced RAW Techniques
Now that you have a solid understanding of the basic RAW settings, let’s explore some advanced techniques to elevate your iPhone 16 Pro Max photography:
1. Bracketing:
- Definition: Bracketing involves capturing a series of images with different exposure values. This technique is particularly useful for high-contrast scenes, allowing you to recover details in both highlights and shadows during post-processing.
- RAW Advantage: RAW files provide the ideal format for bracketing, ensuring that every exposure captures the full dynamic range of the scene.
2. HDR (High Dynamic Range):
- Definition: HDR combines multiple exposures to create a single image with a wider dynamic range, encompassing both highlights and shadows. This results in more detail and a more realistic representation of the scene.
- RAW Advantage: RAW files are the perfect foundation for HDR processing, allowing for precise control over tone mapping and color grading.
3. Long Exposure:
- Definition: Long exposure involves capturing images with a slow shutter speed, blurring motion and creating ethereal effects. This technique is ideal for capturing flowing water, light trails, or star trails.
- RAW Advantage: RAW files provide the flexibility to adjust exposure compensation and white balance during long exposure post-processing, resulting in visually stunning images.
4. Panoramic Photography:
- Definition: Panoramic photography involves stitching multiple images together to create a wide-angle view. This technique is ideal for capturing expansive landscapes, cityscapes, or architecture.
- RAW Advantage: RAW files provide the highest level of detail and color accuracy for panoramic photography, ensuring seamless stitching and a breathtaking final image.
5. Time-Lapse Photography:
- Definition: Time-lapse photography captures a series of images over a period of time, creating a sped-up video of the scene’s changes. This technique is ideal for capturing cloud movements, plant growth, or city life.
- RAW Advantage: RAW files provide the flexibility to adjust exposure and white balance for each frame during time-lapse post-processing, ensuring a consistent and visually appealing final video.
Post-Processing RAW: Unleashing the Creative Potential
Once you’ve captured your RAW images, it’s time to unleash their potential in post-processing. Numerous apps and software options are available, each offering unique tools and workflows. Popular choices include:
- Adobe Lightroom Mobile: A powerful and versatile app for editing RAW images on the go.
- Snapseed: A user-friendly app with a comprehensive suite of editing tools.
- Affinity Photo: A professional-grade app offering advanced editing capabilities.
- Adobe Photoshop: The industry standard for image editing, offering unparalleled control and flexibility.
Tips for Mastering RAW Post-Processing:
- Start with basic adjustments: Begin with basic adjustments like exposure, contrast, and white balance before diving into more complex edits.
- Utilize the histogram: The histogram provides valuable information about the distribution of light and shadow in your image, helping you make informed adjustments.
- Experiment with selective edits: Utilize tools like brushes and gradients to apply specific edits to certain areas of the image.
- Utilize layers: Layers allow you to apply edits non-destructively, preserving the original image data and giving you the flexibility to undo or modify your changes.
- Don’t be afraid to experiment: RAW files offer incredible flexibility, so don’t be afraid to experiment and try different editing techniques to achieve your desired results.
Conclusion: Embracing the RAW Revolution
The iPhone 16 Pro Max’s RAW capabilities open up a world of creative possibilities for mobile photographers. By understanding the intricacies of RAW settings and mastering post-processing techniques, you can elevate your iPhone photography to new heights. Embrace the RAW revolution and unleash the full potential of your iPhone 16 Pro Max’s camera system.
Reference:
Closure
We hope this article has helped you understand everything about Unleashing the iPhone 16 Pro Max’s RAW Power: A Deep Dive into Camera Settings. Stay tuned for more updates!
Don’t forget to check back for the latest news and updates on Unleashing the iPhone 16 Pro Max’s RAW Power: A Deep Dive into Camera Settings!
We’d love to hear your thoughts about Unleashing the iPhone 16 Pro Max’s RAW Power: A Deep Dive into Camera Settings—leave your comments below!
Keep visiting our website for the latest trends and reviews.


